Integrating NWC to Node JS example

Since my previous sharing on Why Should I integrate Nintex Workflow Cloud?, I’ve been thinking to invest more time in giving additional example(s) on how I have used NWC API to integrate the workflow into the project I have been helping out for a partner. As the project is still in stealth mode, I thought maybe I can still share pieces of concepts or works we have done bringing over the NWC tasks to a custom portal built on Node JS.

Nintex Workflow Cloud has been a great platform for us to automate business processes, due to it’s focus not as an end user portal to host business data. Integration scenarios always brought to attention on how to leverage the NWC workflows in a custom portal.

In this article, I am trying to share an actual example on one of the projects using Node JS. The portal’s events of adding or modifying it’s content triggering the NWC workflow to run, as all the users are with the custom portal instead of NWC portal, we have brought over the NWC task into the custom portal for users’ to action on their task(s). The outcome of this is the “Tasks List ” page showing a list of active/pending task of the user shown in the below capture.

Task View Page

The task View Page is filtered with active Task(s) belonging to the current user. User can click on the action icon to show the task detail on a custom form, to either Approve or Reject a task, this is shown in below capture
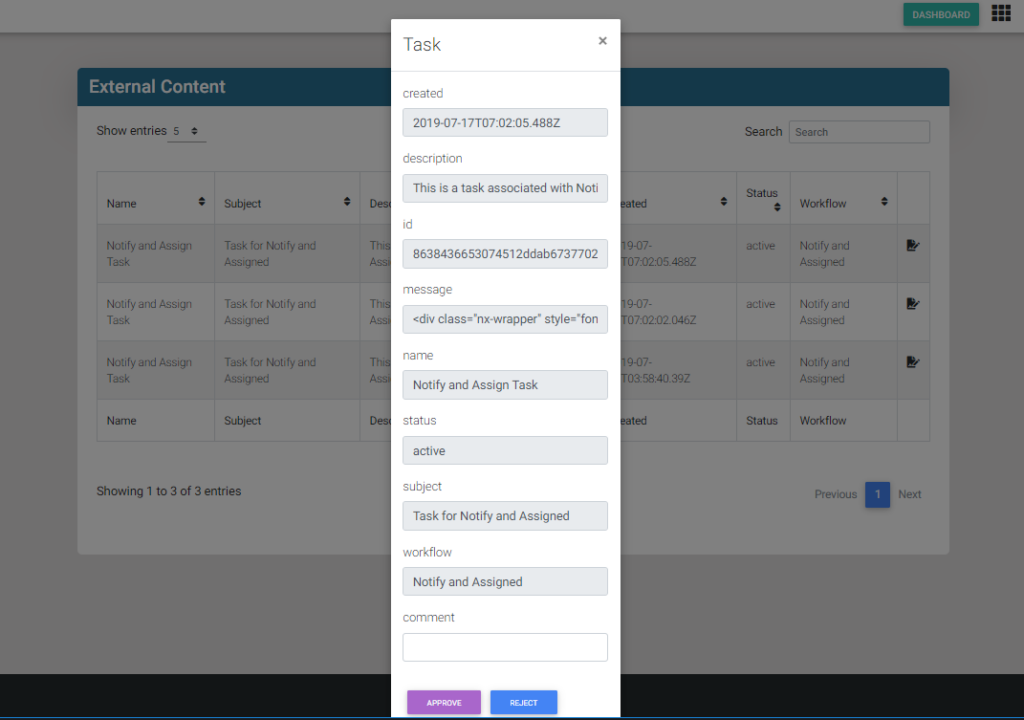
Task Approval

The above scenario is presented using React JS, which is supported by the two routes setup on the Node JS on the server side. I am not sharin the client side React JS modules, assumming if you are using Vue, Angular or other on the client side, the two routes we have setup on the Node’s routing will be the same on helping to get the list of tasks or updating of tasks to NWC. The routes are simple as to “get a list of task(s) filter by status, date, and user”, and “update of a single task” using the NWC provided end points.

const request = require('request')
const URL = require('url')

module.exports = (app) => {

  app.get('/api/external-content',authenticate(), (req, res) => {
    const authorization = {
      authorization: 'Bearer here-is-the-personal-access-token-u-can-get-from-nwc-settings'
    }

    request('https://us.nintex.io/workflows/v1/tasks?from=2018-11-01', { headers: authorization }, (error, response, body) => {
      if (error) console.error(error)
      if (response.statusCode === 200) {

        var res_data = JSON.parse(body)
        if(res_data && res_data.tasks.length!=0){
        res.send({ data: res_data})
      }
    })
  })

  app.patch('/api/external-content',authenticate(), (req, res) => {
    const url = URL.parse(req.url, true)
    const taskId = url.query.task_id
    const headers = {
      authorization: 'Bearer here-is-the-personal-access-token-u-can-get-from-nwc-settings'
    }

    const requestOptions = {
      method: 'PATCH',
      uri: `https://us.nintex.io/workflows/v1/tasks/${taskId}`,
      body: JSON.stringify(req.body),
      headers
    }

    request(requestOptions, (error, response, body) => {
        if (error) console.error(error)
        if (response.statusCode === 200) {
          let result
          try {
            result = JSON.parse(body)
          } catch (err) {
            if (err) result = body
          }

          res.send({ result })
        } else {
          res.send({ result: 'request is not valid'})
        }
      }
    )
  })
}

The above code was easy as NWC’s API documentation at get-tasks, and update-a-task have given us very good code samples not just for Node, but also cURL, C#, JavaScript, Ruby, and Python.

Know Your Workflow Webinar – Cantonese

Every day, your workflows help numerous individuals and lines of business. But if you have hundreds, possibly thousands, of workflows across multiple environments, how do you analyse their effectiveness?

Delivered in Cantonese by Aaron Hui, Nintex Territory Manager, and KokKoon Gan, Nintex Technical Evangelist, this webinar will help you “Know Your Workflow”. Nintex created the Know Your Workflow script that helps you inventory and measure all Nintex workflows across your environment. During the webinar, our presenters will show you recent improvements we’ve made to the outputs of the script and how your organisation can benefit from the insights it provides.

Filtering Tasks List To Show Current User’s Tasks

Well, this is just a quick sharing on how you could filter a Sharepoint list view to show only items or rows belong to the current user (i.e. user who login to the Sharepoint site). One of the usage especially in Office 365 Tasks list, anyone who has edit right to the Tasks list will be able to edit (i.e. approve or reject) any tasks in the Tasks list, including one that is not belonging to you.

In the screen capture below, we can see by default anyone who has access to the Tasks list sees every task in the Tasks list.

We are going to add the following JavaScript to the JS Link (i.e. Client Side Rendering) of the Tasks list to remove the tasks that are not belonging to the current user. Just take the below JavaScript code and save it to a file (i.e. in my case I have named it TaskList.js and uploaded it to the Site Asset library).

(function () {
 function renderListItemTemplate(renderCtx) {
 var userId = _spPageContextInfo.userId;
 if(renderCtx.CurrentItem.AssignedTo[0].id != userId)
 {
 return ''; //do not render row
 }
 return RenderItemTemplate(renderCtx);
 }


 function registerListRenderer()
 {
 var context = {};
 context.Templates = {};
 context.Templates.Item = renderListItemTemplate;

 SPClientTemplates.TemplateManager.RegisterTemplateOverrides(context);
 }
 ExecuteOrDelayUntilScriptLoaded(registerListRenderer, 'clienttemplates.js');

})();

Once that is done, just include the file to the JS Link property of the Task list page as shown below:

That’s all we need to filter a list to the current user. The capture below demonstrates the outcome after the JS Link is applied to the page (i.e. showing only Tasks belong to Richard Roe in my example below).

Power your Microsoft Flow with Nintex Workflow Cloud

I was asked recently to explain how Microsoft Flow could be integrated with Nintex Workflow Cloud. The point of the question was that Workflow Cloud provides enterprise level workflow capability, so it supports custom workflow connectors via the OpenAPI/Swagger definitions.

In this article I’ll explain how we can integrate Nintex Workflow Cloud and Microsoft Flow, leveraging the Nintex Workflow Cloud’s Xtension framework to sync Microsoft Outlook calendar with Google Calendar.

Calling Nintex Workflow Cloud from Microsoft Flow

1. To call Nintex Workflow Cloud from Microsoft Flow, I have created a Nintex Workflow Cloud workflow with an external start event as shown here. I have also included parameters I want to bring over from Outlook Event to sync with Google Calendar Event (in this example, Event Title, location, ID, Start date-time and End date-time).

2. Once the workflow is published, it gives us details on how the workflow could be triggered from external system(s). What we need from this published workflow is the URL as shown below:

3. I have created a blank Microsoft Flow with only two steps added. The first is the trigger “when a new event is created (v1)” of Outlook Event. The second is the HTTP + Swagger as shown below.

4. Paste the URL from the published Nintex Workflow Cloud from step 2 above to the “SWAGGER ENDPOINT URL” as shown below:

5. The “HTTP + Swagger” action will be refreshed with the required parameters as we have defined in Nintex Workflow Cloud. We can now supply the values to pass from Outlook Calendar event to Nintex Workflow Cloud as shown in the diagram below.

Extend Nintex Workflow Cloud with Google Calendar connectors

Nintex Workflow Cloud does not by default provide Google Calendar connectors. However, using the Nintex Xtensions Framework, we can create any connectors we need, as long as they comply with the OpenAPI/Swagger standard.

To do this, here are the steps I followed.

1. Identify Google Calendar APIs.

Google provides rich APIs to its applications/services, including Google Calendar APIs. The reference to the Google Calendar API provides all the details we need, such as end point URL, HTTP Request, and Parameters for the call.

2. The Swagger file we are creating requires us to specify the API scope, which is provided in the reference document and shown in the diagram below.

3. Prepare the Swagger file and save it with a json extension for importing to Nintex Workflow Cloud Xtensions.

{
    "swagger": "2.0",
    "info": {
        "version": "1.0.0",
        "title": "Google Calendar API",
        "description": "Google Calendar API"
    },
    "host": "www.googleapis.com",
    "basePath": "/calendar/v3",
    "schemes": [
        "https"
    ],
    "produces": [
        "application/json"
    ],
    "paths": {
        "/calendars/{calendarId}/events": {
            "post": {
                "tags": [
                    "Insert new event"
                ],
                "summary": "Insert Event",
                "description": "Insert a new event",
                "operationId": "insert",
                "parameters": [
                    {
                        "in": "body",
                        "name": "body",
                        "schema": {
                            "$ref": "#/definitions/Event"
                        }
                    },
                    {
                        "name": "calendarId",
                        "type": "string",
                        "in": "path",
                        "description": "Google Calendar ID",
                        "required": true
                    }
                ],
                "responses": {
                    "200": {
                        "description": "OK",
                        "schema": {
                            "$ref": "#/definitions/Event"
                        }
                    }
                },
                "security": [
                    {
                        "Oauth2": [
                            "https://www.googleapis.com/auth/calendar"
                        ]
                    }
                ]
            }
        }
    },
    "definitions": {
        "Event": {
            "type": "object",
            "properties": {
                "start": {
                    "description": "The (inclusive) start time of the event. For a recurring event, this is the start time of the first instance.",
                    "type": "object",
                    "properties": {
                        "date": {
                            "type": "string",
                            "format": "date"
                        },
                        "datetime": {
                            "type": "string",
                            "format": "date-time"
                        },
                        "timezone": {
                            "type": "string"
                        }
                    }
                },
                "end": {
                    "description": "The (inclusive) end time of the event. For a recurring event, this is the end time of the first instance.",
                    "type": "object",
                    "properties": {
                        "date": {
                            "type": "string",
                            "format": "date"
                        },
                        "datetime": {
                            "type": "string",
                            "format": "date-time"
                        },
                        "timezone": {
                            "type": "string"
                        }
                    }
                },
                "location": {
                    "description": "location of event. Optional.",
                    "type": "string"
                },
                "summary": {
                    "description": "Event title",
                    "type": "string"
                },
                "description": {
                    "description": "Description of the event. Optional.",
                    "type": "string"
                }
            }
        }
    },
    "securityDefinitions": {
        "Oauth2": {
            "authorizationUrl": "https://accounts.google.com/o/oauth2/auth",
            "description": "Oauth 2.0 authentication",
            "flow": "implicit",
            "scopes": {
                "https://www.googleapis.com/auth/calendar": "Read and Write access to Calendars",
                "https://www.googleapis.com/auth/calendar.readonly": "Read access to Calendars"
            },
            "type": "oauth2"
        }
    }
}‍‍‍‍‍‍‍‍‍‍‍‍‍‍‍‍‍‍‍‍‍‍‍‍‍‍‍‍‍‍‍‍‍‍‍‍‍‍‍‍‍‍‍‍‍‍‍‍‍‍‍‍‍‍‍‍‍‍‍‍‍‍‍‍‍‍‍‍‍‍‍‍‍‍‍‍‍‍‍‍‍‍‍‍‍‍‍‍‍‍‍‍‍‍‍‍‍‍‍‍‍‍‍‍‍‍‍‍‍‍‍‍‍‍‍‍‍‍‍‍‍‍‍‍‍‍‍‍‍‍‍‍‍‍‍‍‍‍‍‍‍‍‍‍‍‍‍‍‍‍‍‍‍‍‍‍‍‍‍‍‍‍‍‍‍‍‍‍‍‍‍‍‍‍‍‍‍‍‍‍‍‍‍‍‍‍‍‍‍‍‍‍‍‍‍‍‍‍‍‍‍‍‍‍‍‍‍‍‍‍‍‍‍‍‍‍‍‍‍‍‍‍‍‍‍‍‍‍‍‍‍‍‍‍‍‍‍‍‍‍‍‍‍‍‍‍‍‍‍‍‍‍‍‍‍‍‍‍‍‍‍‍‍‍‍‍‍‍‍‍‍‍‍‍‍‍‍‍‍‍‍‍‍‍‍‍‍‍‍‍‍‍‍‍‍‍‍‍‍‍‍‍‍‍‍‍‍‍‍‍‍‍‍‍‍‍‍‍‍‍‍‍‍‍‍‍‍‍‍‍‍‍‍‍‍‍‍‍‍‍‍‍‍‍‍‍‍‍‍‍‍‍‍‍‍‍‍‍‍‍‍‍‍‍‍‍‍‍‍‍‍‍‍‍‍‍‍‍‍‍‍‍‍‍‍‍‍‍‍‍‍‍‍‍‍‍‍‍‍‍‍‍‍‍‍‍‍‍‍‍‍‍‍‍‍‍‍‍‍‍‍‍‍‍‍‍‍‍‍‍‍‍‍‍‍‍‍‍‍‍‍‍‍‍‍‍‍‍‍‍‍‍‍‍‍‍‍‍‍‍‍‍‍‍‍‍‍‍‍‍‍‍‍‍‍‍‍‍‍‍‍‍‍‍‍‍‍‍‍‍‍‍‍‍‍‍‍‍‍‍‍‍‍‍‍‍‍‍‍‍‍‍‍‍‍‍‍‍‍‍‍‍‍‍‍‍‍‍‍‍‍‍‍‍‍‍‍‍‍‍‍‍‍‍‍‍‍‍‍‍‍‍‍‍‍‍‍‍‍‍‍‍‍‍‍‍‍‍‍‍‍‍‍‍‍‍‍‍‍‍‍‍‍‍‍‍‍‍‍‍‍‍‍‍‍‍‍‍‍‍‍‍‍‍‍‍‍‍‍‍‍‍‍‍‍‍‍‍‍‍

4. Once we have the required Swagger file, we can add it to the Xtensions from the Xtensions page of the Nintex Workflow Cloud dashboard as shown here.

5. As the Swagger file includes the Security Definitions to use OAuth, we will need to provide the required Security details as shown in the diagram below. Note that in our example here, we will select “Google” for the Security value from this page. I shared how to get the Client ID and Client Secret in the “Obtain OAuth 2.0 credentials from the Google API Console” section of my previous blog post Using OAuth 2.0 to access other cloud services from NWC

6. Once we enter the required values of Security, Client ID, and Client Secret, click Next to continue, where we will specify an Icon, Name,and Description for the Connector. I have used Google Calendar and Google Calendar API for the Name and Description values in my example.

7. The new Xtension will be added as shown below

8. We may now edit the Nintex Workflow Cloud workflow to include the new connector to add an event to Google Calendar. Note that we need to add a connection and grant Nintex Workflow Cloud access to the Google Calendar for the purpose. This is required because we need to specify a connection to be used in the connector actions.

With the same approach, we may include all the required Google Calendar API end-points to the Nintex Workflow Cloud.

GKK Compressor Industry – Part 3: Goods Receipt to SAP

A three months Tentative Production Plan helps procurement division to plan what material to acquire to support the production of compressor at the production site. There are two types of materials to be shipped to a production plant,

  1. Movement of material from one plant to the destination production plant/storage
  2. Delivery Order directly from its supplier to the plant/storage

Nintex Mobile application is being used at the plant supporting Goods Receipt at the point where materials are being received. This minimized the need for personnel at the plant to receive goods by noting it on paper, and the need to go back to the office desktop to update the good receipts using a desktop computer with SAP console installed. Updates of good movement is now instantly done over at the point of good receipts using Nintex Mobile, and data are being updated immediately to the SAP system powered by Nintex Workflow with Workflow Connectors provided by Theobald Software.

For the purpose, a “Goods Receipt” form was created using Nintex Form as shown in the diagram below, Nintex Form features bar code or QR code scanning, eliminates the potential human mistakes of typing in long serial number of goods received. Nintex Form could easily be prepared to surface on different devices without much efforts. In this article, as our focus is to look at the integration of Nintex and SAP, we going to keep the form explanation simple here.

Once the data is captured and submitted to the Goods Receipt list, the associated workflow will be triggered to process the data by posting the data to a remote SAP system. This was done with simply using the ERPConnect Services connectors provided by Theobald Software. ERPConnect by Theobald comes with a set of ready to use connectors as shown in the diagram below.  

In this requirement, I have made use of the “Call SAP function” action, it provides full capability to integrate with SAP by simply calling all the available SAP functions, plus the “Z” functions. One thing I find it easy is Theobald Software has a complete documentation and tutorials available on-line (i.e. OnlineHelp – Theobald Software GmbH ) that helps me to do what I need to do for the intergration project. Diagram below shows the “Call SAP Function” action configuration, followed by a table with values I have supplied to the action. 

Table below shows the values i have passed to the required parameters of the “Call SAP function” action. Take note that in my scenario i have fixed some of the values to simplify for the demo purpose. In an actual scenario, we will need to substitute the values reflecting what we have in our form/list design.

GOODSMVT_CODE
GM_CODE05
GOODSMVT_HEADER
PSTNG_DATEfn-FormatDate(Current Date, yyyyMMdd)
DOC_DATE
Tables: GOODSMVT_ITEM
MATERIALR-B209
PLANT1100
STGE_LOC0001
MOVE_TYPE501
ENTRY_QNT
Output
output.GOODSMVT_HEADRET.MAT_DOCMAT_DOC

This is working great so far if we only update one material a time through the “Call SAP Function” action. In our form we have a repeating section where we allow to input more than one material model at any time. Luckily, the action has taken this into consideration as well, this is where we will need to use the “Additional XML table input” parameter of the table section in the “Call SAP Function” action. Theobald-software’s help scenario has provided a very good example on how this could be configured  OnlineHelp – Theobald Software GmbH

Following the example provided in OnlineHelp – Theobald Software GmbH, I have added another Query XML action to wrap the required format of the XML table as below

The final XML content to be passed to the “Additional XML table input” should look similar to the below (i.e. substitute the variables or Item properties with what reflects your design). 

 <?xml version="1.0" encoding="utf-8" standalone="yes" ?><TABLES><TABLE name="GOODSMVT_ITEM"> <GOODSMVT_ITEM>     <MATERIAL>{WorkflowVariable:Material}</MATERIAL>     <PLANT>{ItemProperty:Plant}</PLANT>     <STGE_LOC>{ItemProperty:Storage_x0020_location}</STGE_LOC>     <MOVE_TYPE>{ItemProperty:Movement_x0020_type}</MOVE_TYPE>     <ENTRY_QNT>{WorkflowVariable:Qty}</ENTRY_QNT>  </GOODSMVT_ITEM>  <GOODSMVT_ITEM>     <MATERIAL>{WorkflowVariable:Material}</MATERIAL>     <PLANT>{ItemProperty:Plant}</PLANT>     <STGE_LOC>{ItemProperty:Storage_x0020_location}</STGE_LOC>     <MOVE_TYPE>{ItemProperty:Movement_x0020_type}</MOVE_TYPE>     <ENTRY_QNT>{WorkflowVariable:Qty}</ENTRY_QNT>  </GOODSMVT_ITEM></TABLE></TABLES>‍‍‍‍‍‍‍‍‍‍‍‍‍‍‍‍‍‍‍‍‍‍‍‍‍‍‍‍‍‍‍‍‍‍‍‍‍‍‍‍‍‍‍‍‍‍‍‍‍‍‍‍‍‍‍‍‍‍‍‍‍‍‍‍‍‍‍‍

Here is how the final “Call SAP function” action look like. The formatted XML content is set to valrible “XMLInputGoodsmvt_Item” which is assigned to the “Additional XML table input” field of the action.

GKK Compressor Industry – Part 2: Production Planning powered by Nintex Workflow

I am going to demonstrate a Production Planning process that is powered by Nintex Workflow in this blog post. Before we get further into the production planning process, let us recap what we have gone through together in my previous sharing in Part 1 of GKK Compressor Industry (i.e. RFQ to Quotation process). In the Sales and Marketing division, Product Catalog is being used to create RFQ, which in turn generates quotations issued to customers. Every quotation issued to customer updates the Sales Forecast with the increased number of compressor model to be delivered.

Being a Lean Manufacturing, Production Planning is crucial to GKK Compressor Industry, the critical success factor is produced only what is needed to be delivered on time. It keeps no unnecessary inventory to minimize the waste of inventory space. Tentative Production Plan is always three months ahead of current month, helps the Procurement to keep the Material Management efficient, knowing what material and quantity of material to order with advance knowledge of the requirement from the production.

Key techniques in the production planning to be shared:

  1. Nintex Form Web Part embedded to the “Draft Production Plan” list/page
  2. “Loop” action alternative for immediate execution
  3. Formatting a monthly calendar with CSR

The Production Plan

The Production Plan is a plan used in the production division with details on what models and quantity of compressor to be produced for a particular month. A production line has its daily production capacity that is dependent on machine and human resource capacity. If a production line can go up to 60 pieces of compressor per calendar day with full capacity running three work shifts, two work shifts will give capacity of 40 pieces.

To get the Actual Production Plan, we draft a production plan from monthly sales forecast with details on what models and quantities to be delivered. The diagram below demonstrates how it’s being created powered by Nintex Workflow. The sample plan shows how the quantity of each model to be produced spread over different days with daily capacity of 30 pieces per day for October 2017. 

To produce a total of 71 pieces of compressor for the first model (i.e. SVT125-35), the work has to be spread into three days, with the third day producing the remaining 11 pieces required to make it 71, since on the third day we produced only 11 pieces for the model, it has the remaining capacity of 19 to produce the next model in line (i.e. SHT277NA in the example).

1. Nintex Form Web Part embedded to the “Draft Production Plan” list/page

I find Nintex Form Web Part very useful especially when I need to make Sharepoint page interactive, but it wasn’t discussed a lot. The Draft Production Plan is just one of the solutions I make use of Nintex Form Web Part to get user to specify or collect Production Plan parameters (i.e. Month, Year, Capacity, and to or not to include week ends as working days for the production plan we are drafting). To include that, I simple embed the “Create Production Plan” workflow’s start form to the “Draft Production Plan” view/page as shown below. Once the form is submitted (i.e. with the Start button in the example), the “Create Production Plan” site workflow will be triggered, and the Draft Production Plan list will be refreshed with the production plan that was drafted by the site workflow.

2. “Loop” action alternative for immediate execution

The algorithm I used for drafting a production plan is summarized as below. I have then realized, it took hours for the workflow to complete a “Production Plan”, reason being the “Loop” action will be executed every 5 minutes by default as it is executed by the Sharepoint Timer Job, even If I configured the Timer Job to run every 1 minute (i.e. minimum interval by Sharepoint), it still take a long time for the workflow to be completed.

  Prepare an empty "Draft Production Plan" view (delete all the existing list items)  Query the "Sales Forecast" for models to be produced for the specified month  For-each models in the list     Create a list item for the model to be produced     Split the total quantity for the model into the number of days required     Loop through each calendar day of the production month            Update the daily quantity for the model to the list item (i.e. exclude/include week end)      End Loop   End For-each‍‍‍‍‍‍‍‍‍‍‍‍‍‍‍‍‍‍‍‍‍‍‍‍‍‍‍‍‍‍‍‍‍‍‍‍‍‍‍‍‍‍‍‍‍

We have no choice but to consider to use the “For Each” iteration. Even if you use the State Machine, it is still depending on the Timer Job interval constraint. In order to do that, we will need to calculate the number of loop required, and create a collection of the required number to use the For-each iteration. So, if the quantity to be produced is 71, 71 divide by daily capacity of 30 equals to 2.3667. We get the whole number of 2 leaving behind the fraction, as 2 will be used as collection index of 2 for three iteration (i.e. index starts at 0). This is true if we always start a day with the new daily capacity (e.g. 30), but we will need to consider what if capacity for the day is not always starts from the beginning. In the sample production plan above, the quantity of 22 for model SNT207V is taking 2 days to produce, because the capacity of the day it starts the production was 1 (i.e. 30-29=1) as 29 was used to produce the model prior to it. To get the right count of iteration required, we will need to add the remaining quantity of the last model before we divide the quantity with the capacity, the two calculation actions shown below give the right formula to get the required number of iteration.

3. Formatting a monthly calendar with CSR

From the above Draft Production Plan example, I have customized the “Draft Production Plan” custom list into a calendar look and feel, by coloring the columns representing “week end” into grey. The Custom Side Rendering (i.e. CSR) is a feature by Sharepoint is being used to get the calendar view.

SP.SOD.executeFunc("clienttemplates.js", "SPClientTemplates", function() { 
     SPClientTemplates.TemplateManager.RegisterTemplateOverrides({ 
          OnPostRender: function(ctx) {
               var rows = ctx.ListData.Row;
               var month = rows[0]["Month"];
               var year = rows[0]["Year"];
               var weekends = [];
               var date = new Date(year, month, 0);
               var lastDay = date.getDate();
               for (var d=1;d<=lastDay;d++)
               {
                    date.setDate(d);
                    if (date.getDay()==0 || date.getDay()==6){
                         weekends.push(d);
                    }
               };
               for (var i=0;i<rows.length;i++)
                    {
                         var rowElementId = GenerateIIDForListItem(ctx, rows[i]);
                         var tr = document.getElementById(rowElementId);
                         for (var j=0, len=weekends.length; j<len;j++){
                              var td=tr.cells[weekends[j]+2];
                              td.style.backgroundColor = "#eeeeee";
                         }
                    }
               }
     }); 
});

I have include the script as JSLink shown below

GKK Compressor Industry – Part 1: RFQ to Quotation with Nintex Workflow Cloud

RFQ to Quotation

We all know we are here because we work on something that is related to Nintex Workflow or Forms, and the reason we use Nintex Workflow or Forms is because it makes our life easier. Things have changed a lot these days, trending towards the cloud, hybrid environment becoming very common that most of us are working on both on premise platform and at the same time on the cloud. Regardless of which platform you use, you will find Nintex helps.

Part 1 of GKK Compressor Industry blog series, I am going to share exactly how I use my hybrid environment to save the efforts for my recent investment – GKK Compressor Industry. GKK Compressor Industry is “Lean Manufacturing” produces world class compressors. Moving towards a Six Sigma company, Simplifying Processes and Reduced Errors falls in its Lean Six Sigma project mission to turn the company into highly effective and efficient company.

RFQ (i.e. Request for Quotation) is one of the key Sales and Marketing processes involving its customers. The figure of RFQ to Quotation shown above, demonstrates how Nintex Forms is use allowing customers or internal sales to fill up an RFQ form powered by Nintex Forms. The output of RFQs are Sales Forecast (i.e. use for Production Planning) and Quotations (i.e. issued to customers). The process is simplified at GKK Compressor Industry, Nintex Workflows automates the RFQ process by getting the unit price for the requested compressor models to provide the prices, and it auto generates an Quotation in Excel Format, and finally it updates the Sales Forecast with the quoted Compressor models. The RFQ process not just simplifies the process with reduced steps, it also eliminates potential human errors by auto generating the required quotations.

The quotation generation is done by simply calling a Nintex Workflow Cloud workflow from its RFQ process powered in its Sharepoint environment. It’s worth taking a trip to Nintex Workflow Cloud for a quote generation, as we realized it supports OpenApi (i.e. Swagger) by its Xtensions framework. We make use of the Xtensions to include the Microsoft Graph API connectors in Nintex Workflow Cloud helping us to create quotation based on our pre-designed Excel Quotation template, as we only need some functions to create Excel quotation, we brought in only few Excel related end-points of the Microsoft Graph API.

Microsoft Graph API - Excel

Based on the connectors defined and shown under the Microsoft Graph API – Excel action group, you will notice there is no connector to create or copy excel file, this is because I have made use of Nintex Workflow Cloud’s default Sharepoint conector to copy a Excel Quotation Template to a new quotation with the name I provided. The Sharepoint “Copy a file” connector’s configuration is shown below.

Sharepoint connector - Copy a file

Once the new file is created/copied from a pre-designed template, what I will need is basically

  1. “Add table rows” for quotation items
  2. “Delete table rows” for unwanted rows in the excel table
  3. “Update a nameditem” for its value
  4. And so on…

I have attached my swagger file for the Microsoft Graph API – Excel connectors. Few notes to take if you want to implement the Graph API for Excel using the swagger file shared in this blog:

  • To enable the connector, you will need to create an Azure Active Directory application (i.e. here Is my previous blog on how to create one https://community.nintex.com/community/tech-blog/blog/2016/10/20/microsoft-graph-api-from-nwc)
  • Excel related operation of Microsoft Graph API seems to work only with its “beta” version (i.e. not the “1.0” version) for files resides on Sharepoint library (i.e. I am not sure why and if this is correct, but I only managed to get it work with the “beta” version).
  • There are two ways to create the Azure Active Directory app, one via the new Azure Portal, the other using the old portal (i.e. I only got it works with Active Directory app created by the old Azure portal)

Why Nintex Workflow Cloud even if you code?

For those of us who tried or in the process of evaluating integrating Nintex Workflow Cloud into your solution(s), eventually you will get to the question “Why should I integrate Nintex Workflow Cloud?” especially if you code your solution from scratch using platform such as .NET or Java, writing code will be the default way to support any business logic or process(es) of the solution you are building with such platform. Here is my two cents worth for that question.

Before we get into discussing why, let us get few more examples here. Take another solution platform for the same question – Sharepoint, which is considered as COTS (i.e. commercial out of the box solution) for intranet/collaboration portal. We do not expect lot of coding or customization, by default Sharepoint supports document management with its content type of Document Library, supports creating of custom records using Custom List, when come to automating a document or record created in Sharepoint, it is not going to be easy especially we expected it to be COTS, Nintex Workflow is just the right fit to complement the weaknesses making process automation possible on Sharepoint.

So now the question is when you create your solution from scratch using platform such as .NET or Java, by default you will code everything yourself and it would be much flexible and powerful to you when come to coding. Similar to if you are using Mendix for instance for your solution, it has what it called Micro-flow to support logic behind defined objects, events, etc. in Mendix solutions, why would I consider to integrate Nintex Workflow Cloud since the platform itself supports business logic?

Reasons to integrate Nintex Workflow Cloud to your solution(s)

Take Nintex Workflow Cloud to replace some of the building block of your .NET or Java solution, helps your saving efforts on reinventing the wheels. The building blocks of a custom built solution usually consists of different modules/blocks to handle different function groups, for examples there will be modules such as:

Security/Login moduleUser ManagementUI (Portal Pages, Forms, Views, etc.)Report ManagementBusiness Process/WorkflowsDocument Generation/ProcessingElectronic Signaturee.g: Solution Architecture Diagram of a custom developed solution

1. Workflow Module

In a solution architecture of a custom developed application/solution, we often modularized it into different module/design blocks. Some of the benefits of modular design is that modules could be reused in another solution, some of the modules could be puzzled with ready to go solution(s). The above example of a solution architecture diagram illustrates a need to include a Workflow engine, which should be handled by a ready to go solution such as Nintex Workflow Cloud, which makes a lot more sense than having to develop all the workflow functionality and management from scratch.

2. Document Generation

The above scenario tells us that we will need to build all these modules, of course if you have done one before you could re-use it, if not you will need to spend tremendous effort to write one. Nintex Workflow Cloud comes with some niche and unique features such as Document Generation. Automated document processes are common in today’s business processes, majority of the solution requires the creation of document manually using a word template for instance, these processes could be improved by Document Generation features of Nintex Workflow Cloud. If document creation to be automated, one will find it challenging as there ain’t many options of API to do that. It become more challenging if one will need to keep the solution up to date with never ending evolving technology of document API. This is a good scenario and good opportunity to pass the job to Nintex Workflow Cloud. The automation of document generation could be passed to Nintex Workflow Cloud,  once it’s done, it saves the generated document to a specified shared drive where the initiation program could pick that up from there.

3. System Integration

One of the strength by Nintex Workflow Cloud is the capability and rich set of connectors and actions supporting integration with other systems. Further more, with the compliance to the Swagger standard, it is easy to extend to include connectors to other system that was not already included as part of the default connectors. Capability to integrate with external system is always one of the huge area in a solution, and it usually requires huge effort to build and manage, leveraging that as part of the Nintex Workflow Cloud not just saves the effort to build one, but also provides the flexibility when come to extending of connectors to other systems.

Again, these are just my two cents worth for the question by providing just few examples here. I believe there are many more reasons to explore, such as Public Web Form? if your solution is an Intranet based deployment, most of the time you are not going to expose your so called Intranet solution to the public facing internet, leveraging the Nintex Workflow Cloud’s Anonymous web form could a a quick solution to the requirements.

The concept of modular design with integration of Nintex Workflow Cloud as the required Workflow module is not just saving you the effort to creating one from scratch, it helps when you left the solution to a customer after you done the development project, clears off hassles for your customers to maintain or troubleshoot the workflow module. IT platforms are being patched and updated at a fast pace today, patches and updates introduces huge bandwidth of maintenance. Getting Nintex Workflow Cloud to handle some of these functionality minimizes the risk and needs to continue maintaining the code. 

Complete Your Suite – Southeast Asia

During the webinar, Nintex Technical Evangelist, KokKoon Gan, and Nintex Territory Manager, Andy Gunawan, discussed the solutions that you can implement to easily generate business critical documents, analyse your process portfolio and build powerful mobile apps across the entire Nintex platform. See how your business can enhance the value of your Nintex investment from our Workflow and Forms solutions from Nintex Analytics, Nintex App Studio and Nintex Document Generation.